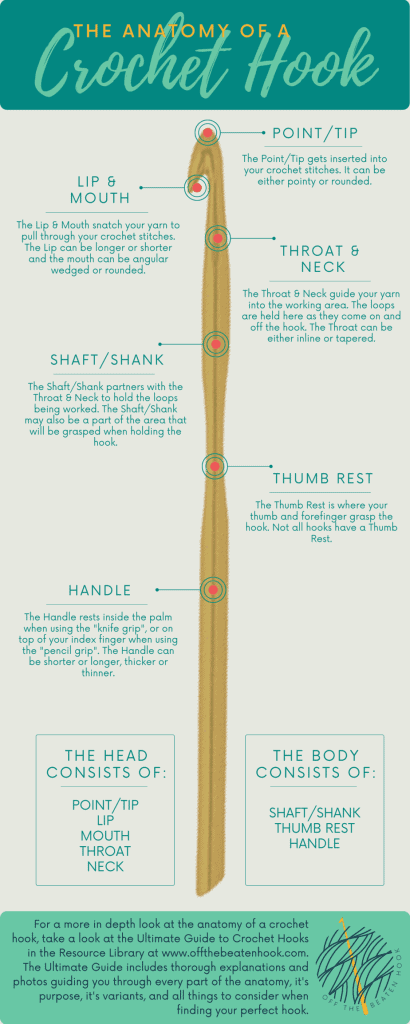
Skip to Main Content

Kit Instructions

Button Maker Kit #2

Crochet Kit

The Anatomy of a Crochet Hook QRC Infographic

Point/Tip:
The tip of the hook is also referred to as the point. This is the part that gets pushed through your crochet stitches. The tip can be pointier or rounder. Pointier tips are easier to push through stitches, but they can split your yarn if they are too sharp.

Lip & Mouth:
The lip is what snatches your yarn after you push your hook through a stitch and “yarn over”. The loop then gets kept in the mouth as you pull the hook back through the stitch. The shape of the lip affects the shape of the mouth. It can be either more angular or rounded.

Throat & Neck:
The throat & neck guide your yarn into the working area. The loops are held here as they come on and off the hook. Based on how many loops you have on the hook, they may gather down towards the shaft. The throat can be either inline or tapered.

Shaft:
The shaft of the hook is also referred to as the shank. It partners with the throat & neck to hold the loops being worked. Loops will slip up and down this area as you are working your project. The shaft plays the critical role of determining the size of your stitches and is what the size of a hook is based upon (4mm, 7mm, etc). Depending on how you hold the hook, and the length of the shaft, you may also be grasping this area off and on while working your project.

Thumb Rest:
The thumb rest is also referred to as the grip. Not all hooks have a notable thumb rest. If there is one, it is designed to be a comfortable and obvious place where you hold the hook between your thumb and index or middle finger. The thumb rest may be a flatted area of the hook or made obvious by some type of padding like silicone, rubber or foam pad. If a hook is considered ergonomic, it is because of a specialty thumb rest and handle.

Handle:
The handle is the single largest and longest part of the hook. This is the part you hold. It rests inside your palm if you use the knife grip. It will rest on top of your forefinger if you use the pencil grip. The handle and the thumb rest are what determines if a hook is ergonomic. It provides stability as you work your project. The handle can be shorter, longer, thicker, thinner, plain or decorative.


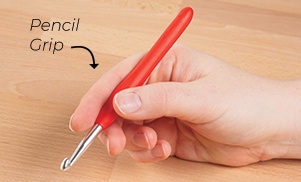
How Do I Hold My Crochet Hook?

There are many different ways to hold your crochet hook. The way YOU choose will depend on the type of crochet project you’re working on as well as what’s comfortable for you. Most people choose from two main grips:

1. The Pencil Grip - Your hook is held like a pencil, with a three-fingered pinch. (shown in the image below)

Pencil Grip

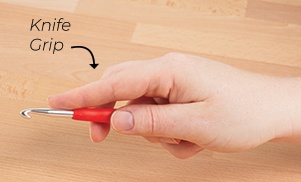
2. The Knife Grip - Your hook is held like a steak knife, with your last three fingers controlling the motion of the hook. (shown in the image below)

Knife Grip

Here are some other common ways to hold crochet hooks.
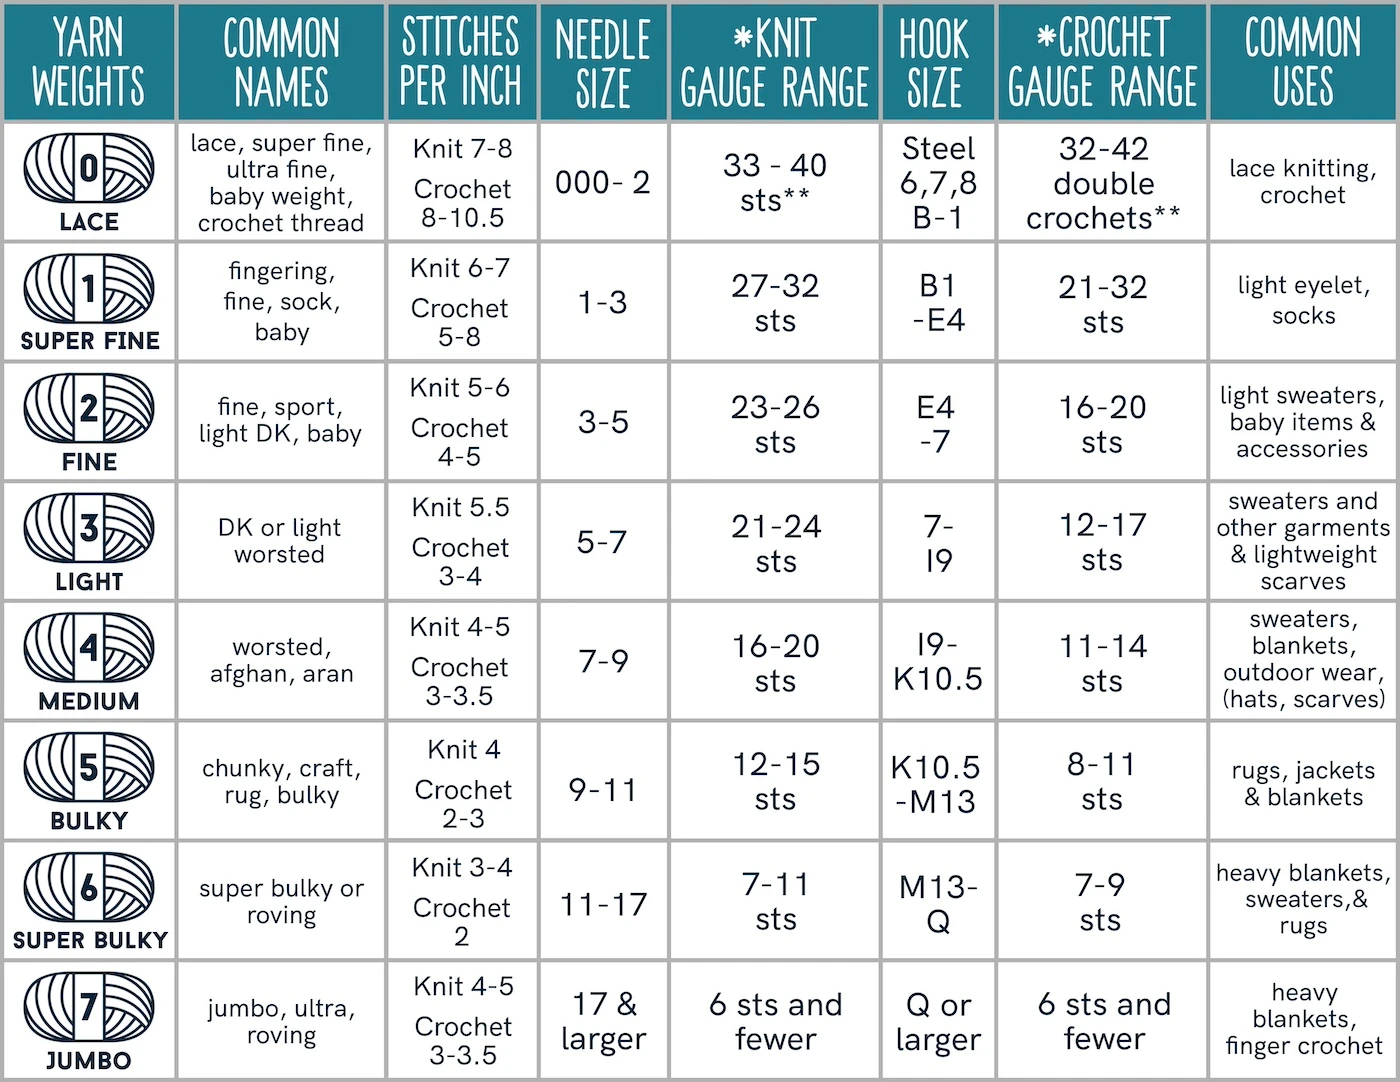

Crochet Hook Sizes

Crochet hooks are measured in millimeters (mm), but also have a corresponding letter from the alphabet and/or number (US size), though these can vary depending on the manufacturer. Different hook sizes can be chosen for different purposes. Each yarn label usually has a recommendation for what hook size to use with that particular yarn. Use the hook size recommendation as a jumping-off point to help you figure out which hook to use, but do pay attention to the gauge swatch recommendation if you are making a crochet pattern that needs to fit a particular way.

Need more information on hooks? Please visit the Craft Yarn Council.


Crochet Chart Symbols

Did you know that symbols are being used as an addition to or in place of words in a crochet pattern description?

Here are some of the most common symbols used


Program Tip

Create or print Handmade By tags such as the two below.

Handmade By tag 1

Handmade By tag 2

Need more information on what the care symbols mean?


Understanding Yarn Weight

Below are the industry standards for yarn weights. Please visit the Craft Yarn Council for more information. 

Yarn weight chart with gauge


Crochet Abbreviations

Here is a printable quick reference guide to the most commonly used crochet abbreviations.

For a more in depth look into crochet abbreviations, please visit the Craft Yarn Council


The Craft Yarn Council offers so much free information!

Standard Body Measurements/Sizing

Baby Size Chart

Foot Size Chart for All Ages

Child/Youth Size Chart

Woman Size Charts

Man Size Chart

Head Circumference Chart for All Ages

Hand Size Chart for All Ages

Crochet 911

Art Kit #1

Abstract Clay Project for Kids inspired by artist Liz Payne — ART CAMP

Recipes:

Suggested material to use with this kit: 

  • For easy cleanup:
    • plastic
    • paper grocery bags
    • masking tape
  • Fun project material:

34 Best Clay Crafts for Kids ideas | clay crafts, clay, crafts

Learning Activities with Clay Letters, Numbers, and Arithmetic Symbols:

  • Letter & Number Recognition
    • Letter identification and alphabetical order.  
    • Number identification and arranging numbers in ascending/descending order.  
    • Basic math practice.  
    • Practice spelling words and sight words.  
  • Hands-On Activities
    • Letter Search & Identification - Arrange letters on the table and have kids visually scan to find them in alphabetical order.  
    • Letter Formation Practice - Copy letters using clay to work on handwriting and motor skills.  
    • Word Association Game - Pull out a letter and ask the child to name a word that starts with that letter. Have them write the word to practice handwriting.  
    • Decodable Reading & Word Building - Use clay letters to practice phonics and create words.  
  • Additional Learning Activities
    • Fine Motor Skills Development - Rolling, pinching, and shaping clay strengthens hand muscles needed for writing.  
    • Pattern and Sequence Building - Form simple patterns (e.g., ABAB or ABCABC) using clay letters and numbers.  
    • Tactile Sensory Exploration - Encourage kids to close their eyes and identify letters or numbers by touch.  
    • Creative Storytelling - Form letters into simple words and use them to create a short story or sentence.  
    • Matching Games - Match clay letters to printed letters or clay numbers to corresponding dot representations.  
    • Color Recognition - Use different clay colors to group vowels and consonants or even/odd numbers.  

Suggested links:

Art Kit #2

Below are visuals of the types of paint brush provided in our set.


Key points to remember for cleaning brushes:

  • Different mediums require different cleaning methods:

    • Acrylics: Can be cleaned with warm water and mild soap. 
    • Oil paints: Use a solvent like mineral spirits or turpentine to remove the paint effectively. 
    • Watercolors: Rinse with clean water, sometimes adding a bit of soap for stubborn stains. 
    • Gouache: Similar to acrylics, clean with water and soap. 
  • Cleaning process:

    • Blot excess paint: Before cleaning, blot the majority of paint off your brush with a paper towel. 
    • Choose your cleaning solution:
      • For water-based mediums: Use warm water and mild soap. 
      • For oil-based mediums: Use a solvent like mineral spirits or turpentine. 
    • Swirl the brush: Gently swirl the brush in the cleaning solution to loosen the paint. 
    • Rinse thoroughly: Rinse the brush under running water until the cleaning solution is completely removed. 
    • Reshape the bristles: While the brush is still wet, gently reshape the bristles with your fingers. 
    • Air dry: Allow the brush to air dry completely in a flat position.
  • Important considerations:
    • Do not soak brushes for long periods. Excessive soaking can damage the ferrule (the metal part holding the bristles). 
    • Safety precautions: when using solvents, always work in a well-ventilated area and wear gloves if necessary.


LED Light Pad instructions and product information

Battery is fully charged in 2 hours. Works for 4-6 hours.


Portable easel instructions:


Suggested material to use with this kit: 

  • Drawing material:
    • Tracing paper
    • Sketch books or artist paper (depending on what implement you are using, there are different styles of paper that best suit them.)
    • different graded pencils such as 2H, 2B, & 6B.
    • charcoal or graphite
    • Putty erasers (plastic erasers can smug your work)
    • coloring pencils or markers


  • Painting material:
    • masking tape
    • paint (acrylic, oil, watercolor, etc.)
    • canvas
    • watercolor paper
    • varnish or mod podge for sealing art
    • plastic for easy cleanup

                    The Origins of 7 of Your Favorite Art Supplies | Britannica


Suggested links: